A cleaver sample can pass a meeting room check and still fail on the grinding line. We have logged 30+ cases during sample sign-off: a handle scale sitting 0.4 mm proud under the Mitutoyo digital caliper, no spine radius on the spec sheet, QC pulling a carton label with the FNSKU missing, or a drawing calling for 58-60 HRC while the PO says 56-58 HRC. The line stops there.
For retail private label teams, sample approval is not a beauty check. It locks the product. At TANGFORGE in Yangjiang, China, we treat the signed cleaver sample as a production control document, the same one the line leader checks against at the first-piece inspection table. Buyers sometimes ask, “Does it look good?” Wrong question. Ask this instead: “Can we repeat this for 20,000 pcs without the line leader guessing?” Our cleaver line runs about 80,000 units/month across stamped and forged models, but the math does not work when the approved sample, BOM, artwork file, or AQL inspection sheet disagree. Last season the buyer flagged one PO because “black POM handle” became “black PP handle” in a single line item. Small typo. Big delay.
Define The Sample Before You Judge It
The first mistake is signing off a cleaver sample before both sides agree what the sample is supposed to prove. Appearance only? Cutting feel? Packaging layout? Final pre-production approval? Different job, different risk. A visual sample might be hand-polished on the sample bench with substitute steel, while a pre-production sample must match the confirmed steel grade, heat treatment target, handle material, logo process, carton packing, stamping die, and bulk fixture. QC pulled one 7-inch cleaver sample last month with a clean satin face, but the digital caliper showed the spine was 2.3 mm thinner than the drawing at the heel. Pretty sample. Wrong sample.
For a private label cleaver program, ask your cleaver knife supplier to tag each sample with version number, sample date, steel grade, handle material, surface finish, packaging version, and drawing revision. Put it on the sample tag. Do not leave it buried in an email thread. If the sample room makes it by hand but bulk production will run on a fixed grinding jig or a new stamping die, write that on the tag as well. We have seen this go sideways: the buyer approved “V2” on WhatsApp, while the PO item description still said “V1,” and the merchandiser missed the typo before the grinding line started.
At TANGFORGE, a normal custom cleaver knife sample cycle is 10-18 days after artwork and drawings are confirmed. We run closer to 10 days when the blade shape and handle use existing tooling; it lands nearer 18 days when the logo etching, surface finish, or box artwork needs two rounds. If a new forging die, new handle mold, or custom gift box is involved, the first approval may take 25-35 days. That timing is still cheaper than repairing 3,000 pcs after the handles are pinned and the color cartons are printed. The math does not work. One wrong brass rivet spec can stop the packing table for 2 days while cartons sit open beside the barcode scanner.
Your approval package should include five basic files: product drawing with mm dimensions, bill of materials showing steel and handle specs, logo placement file with size and position, packaging artwork with barcode and country mark, and inspection checklist with AQL points. If those five documents do not match the physical sample, pause. A good cleaver knife manufacturer in China will not take offense. A rushed factory will say, “production will be correct.” Wrong answer. That is not a control method; it is a guess, and buyers flag it fast during final inspection when QC pulls the carton and checks the sample against the signed checklist.
Lock Blade Geometry And Cutting Feel
A cleaver sells on the shelf because the outline looks strong and the polish catches light. Returns start at the cutting board. Put the sample on the bench and measure it with a Mitutoyo digital caliper, not a phone photo from the showroom. For a Chinese vegetable cleaver, blade length usually sits at 175-210 mm, blade height at 85-115 mm, and spine thickness at 1.8-3.0 mm. For a heavy butcher cleaver, thickness may run 4.0-6.0 mm, with weight pushed toward the front. Those numbers decide the product category, carton weight, user expectation, and safety risk. We once had a PO typo change “2.0 mm spine” to “3.0 mm spine”; the buyer flagged the sample as dead in hand before we even discussed price.
Match the edge angle to the work. A vegetable cleaver can run 15-18 degrees per side for clean push cutting through cabbage and scallion. A bone cleaver needs 22-28 degrees per side, often with a convex secondary edge so the edge does not chip on pork rib. Sharp once is easy. Repeatable sharp is the hard part. If the sample cuts well because the sample technician hand-thinned it on the grinding line, mass production must copy that edge without adding 18 minutes per 50 pcs. Ask for a target behind-the-edge thickness: 0.35-0.55 mm for vegetable models, or 0.8-1.2 mm for heavier chopping models. QC should check it with a feeler gauge before packing, not after the cartons are taped.
Balance beats catalog weight. Around 7 out of 10 retail buyers we meet write total weight only, but the balance point tells you how the knife feels after 20 minutes of prep work. For a vegetable cleaver, a balance point around 15-35 mm forward of the handle is normal. For a heavy cleaver, more forward weight is expected. If the approved sample is 365 g and production tolerance is left open, one batch can arrive at 420 g and feel like another SKU. QC pulled this exact issue once with a hanging scale and a simple ruler before carton sealing. The math does not work if purchasing approves grams while sales promises hand feel.
Check the safety details before you sign the sample card. The spine and heel should not be sharp unless the drawing says so. A 0.3-0.6 mm eased spine radius is a small detail, but buyers notice fast when it is missing. The choil area should not catch skin. The blade face needs enough flatness for food release and easy cleaning, with no obvious warp. For retail private label, “looks straight” is the wrong standard; we run a flatness check on a granite plate and document the acceptable tolerance, for example less than 1.5 mm visible warp over the blade length.
Confirm Steel, Heat Treatment, And Finish
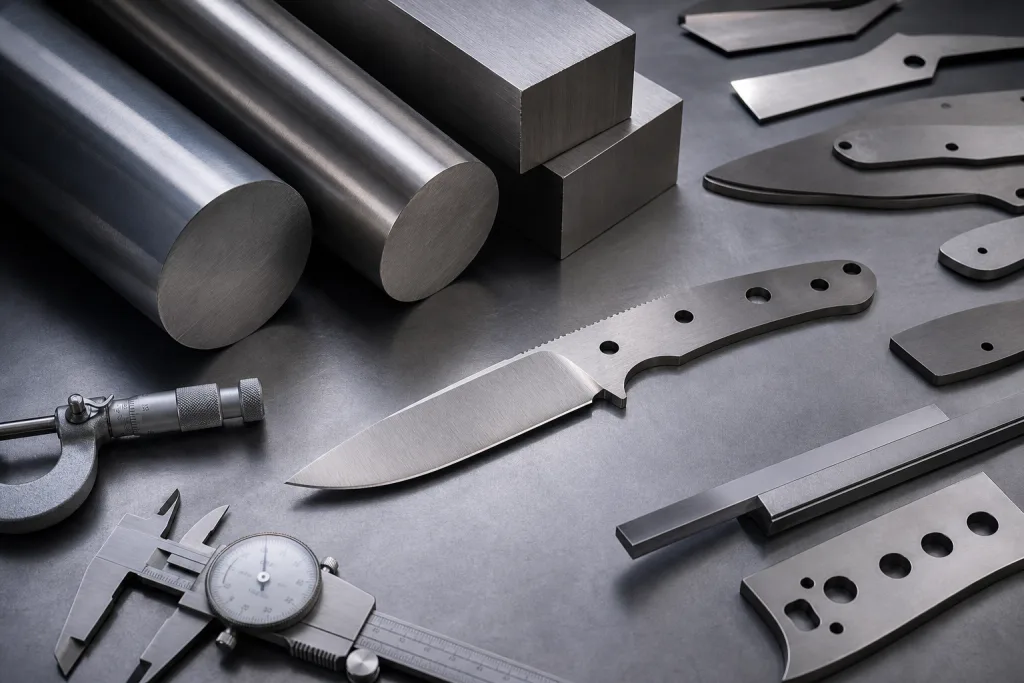
Steel names get loose fast in cleaver knife wholesale sourcing. “German steel” is fine for catalog copy, not for QC. “High carbon” gives the inspector no test point. “Damascus style” often means a surface pattern, with no promise on core steel. Put the steel grade and target hardness on the PO, not just on the sample tag. For common stainless cleavers, 3Cr13 may target 52-54 HRC, 5Cr15MoV may target 55-57 HRC, and 1.4116 or X50CrMoV15 often targets 55-58 HRC. Carbon steel and powder steel projects can run a different band, but the band still needs numbers. We had one buyer write “HC steel” on a sample tag; our lab stopped the grinding line for 40 minutes until the grade matched the material card and coil label.
Do not chase maximum HRC. This is the wrong question to ask. A heavy chopping cleaver at 60 HRC can chip if the edge geometry does not fit the job, mostly when the edge is 0.28 mm before final sharpening. A vegetable cleaver at 52 HRC may roll after 14 days of home use, then the complaint photos start coming in. A practical HRC band is tighter than some buyers expect: plus or minus 1.5 HRC is reasonable for production knives when heat treatment is under control. On our last 5Cr15MoV run, QC pulled 6 blades after tempering and checked them on the Rockwell tester before handle assembly; 1 blade read 54.8 HRC, so we held that rack instead of pushing it to polishing.
The surface finish needs approval wording too. Satin can mean a 180 grit coarse line finish or a cleaner 320 grit finish with direction lines checked under a 6500K inspection lamp. Those are not the same product. Mirror polish can show waves if the blade is over-buffed, mostly near the heel where wheel pressure changes. Stonewash hides scratches, but it can clash with food-contact positioning if the blade is not washed after tumbling. Ask your cleaver knife factory for finish samples or macro photos under the same light and angle. We have seen this go sideways when a buyer approved “satin” by email and later rejected 1,200 pcs for visible belt lines after QC pulled the sample beside a 320 grit master blade.
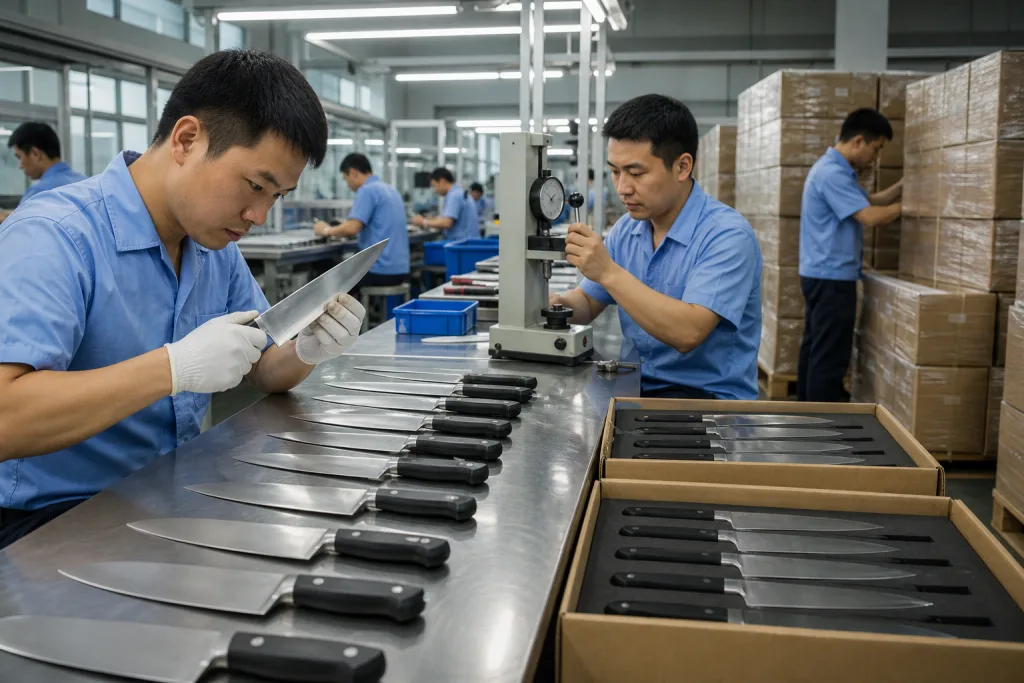
Testing does not need to be academic, but it must be real. For retail programs, we recommend at least 3 Rockwell hardness checks per batch, 100% visual edge inspection, and functional cutting checks from 5 random production units using the same paper or rope spec each time. If the product claims stronger performance, add CATRA testing or a controlled rope/cardboard cut test with the fixture setting written down. For food-contact markets, stainless steel and handle coating need paperwork; adhesives and printed packaging may need REACH, LFGB, or FDA-related documentation depending on the destination. QC should record the blade lot, each HRC reading with tester ID, and the exact carton mark before shipment; one PO typo on a steel grade is enough to hold the container for 2 days.
Check Handle Fit, Hardware, And Hygiene
Handle problems start 30-40% of cleaver sample arguments in our office. Buyers check the blade first and touch the handle last. Wrong order. A cleaver has a wide blade, wet hands, oil on the board, and a hard downward chop, so the handle has to lock into the palm and wash clean where meat juice or ginger juice reaches the joint. Before approval, hold the knife dry, then wet your palm and run 20 chops on a PE cutting board. Check the palm swell against your target user, feel whether the butt edge bites, and measure finger clearance from the heel at 8-10 mm minimum. QC pulled one 7-inch sample last month because the butt corner looked fine in photos but left a red mark after 20 chops.
For riveted full-tang cleavers, check scale-to-tang fit with your fingertip and a 0.2 mm feeler gauge. A step over 0.2-0.3 mm is easy to feel and looks cheap in close-up listing photos. Rivets need to sit flush, not proud or sunken; we reject any rivet that catches a cotton swab at final QC. If the handle is pakkawood, G10, micarta, PP, TPR, or ABS, write color tolerance and surface texture into the sample comments. “Black handle” is poor wording. We had one 1,200-piece run come out matte charcoal while the approved sample looked glossy black under the packing room LED light. The buyer flagged it. Fair point.
Hygiene matters for kitchen retail, more so when the cleaver is sold for meat prep. Gaps around the bolster, tang, rivets, or end cap trap water and food residue. Ask for a glue line check and a water soak check. We run a simple factory test: 2-hour warm water soak at 45-50°C, then visual inspection for swelling, open gaps, or color bleeding. Wipe with a white tissue after the soak. Color transfer shows fast. Dishwashers are a separate claim. If your packaging says dishwasher safe, the product has to survive repeated high-temperature wash cycles. The math does not work for most wooden and pakkawood handles, so do not print that claim unless the wash test backs it up.
For molded handles, check injection gate marks and parting lines before the sample gets signed off, then do a peel check on the overmold seam. Small marks become big complaints. We have seen this go sideways when the sample handle was hand-trimmed with a utility blade but production handles came straight off the mold; by carton 200, the flash looked rough. For export retail, check restricted substances too. Some soft-touch materials create REACH problems in Europe when the compound is not locked. A serious cleaver knife manufacturer in Yangjiang, China should state the handle resin, color masterbatch, coating, and adhesive used in the BOM. We run this through the BOM sheet before tooling confirmation because one wrong TPR compound can delay shipment by 12 days.
Approve Packaging As A Product Component
Packaging is not decoration after the cleaver clears grinding. It is part of the SKU. We run it that way on the packing line. Approve the cleaver without packaging and you have approved half the product. Retail private label teams need to check inner protection, blade guard or sheath, printed box, barcode, warning label, country of origin, care card, master carton, and the exact PO item code on the carton mark. For Amazon or marketplace orders, confirm FNSKU, suffocation warning when polybags are used, carton weight limit, and scan quality before mass printing. QC once pulled 12 good cleavers from a carton because the barcode printed too light on a 300 gsm box; the buyer flagged it before the knife reached shelf, and the PO had “CLV-8IN” typed as “CLV-81N” on two carton marks.
A cleaver weighs more than a chef knife and carries a taller blade, so thin blister cards and weak magnetic boxes fail fast. The blade moves. On our packing bench, a 2.5 mm sleeve that looks safe in a PDF can still let the edge mark the insert after a 1 m drop test. A mail-order pack normally needs a blade sleeve, tip protector, cable tie or paper lock, inner tray, and 5-ply export carton, with the cleaver fixed so it cannot punch through the side wall. For retail stores, decide hang-hole strength and anti-theft display needs before the box die-line is cut. Asking after sample approval is the wrong question; we have seen this go sideways and add 12 days vs 18 days to a launch because the magnetic box had to be rebuilt.
| Item | Approval Target | Typical Risk |
|---|---|---|
| Barcode | Grade B or better scan test | Wrong SKU or weak black-white contrast |
| Inner box | Knife fixed after 1 m drop logic | Blade cuts carton or sleeve |
| Master carton | Usually under 18-20 kg gross | Carton crush or warehouse rejection |
| Country marking | Made in China placed as required | Customs delay or relabeling cost |
| Warning text | Market-specific language checked | Retail compliance hold |
Approve artwork from a printed sample, not from a PDF alone. Screens lie. Colors shift on kraft paper, coated paper, and textured gift boxes, so each substrate needs its own check under normal packing-room light, not under a showroom lamp. If your brand uses Pantone colors, write the Pantone number and the allowed delta E or a signed visual limit on the sample tag. On a recent job, QC pulled the sample under the D65 light box and found the logo went muddy on uncoated paper, while the same file looked clean on screen. For custom packaging, MOQ can run higher than the knife MOQ; a box supplier may require 1,000-3,000 pcs per print run, and the math does not work when the buyer approves 600 knives but leaves the box until final inspection.
Set Inspection Criteria Before Mass Production
About 7 out of 10 buyers ask for inspection after production, then argue about what counts as a failure. Too late. Set the line at sample approval, before we run steel through the grinding line. Your cleaver sample checklist should split defects into critical safety failures and major spec failures, with minor cosmetic marks handled by signed limit photos. Critical means unsafe broken handles, exposed sharp burrs on the spine or choil, wrong steel grade, wrong logo ownership, or contamination found when QC pulled the sample under the bench light. Major means blade warp beyond tolerance, loose rivets checked with a 3 mm probe, wrong HRC, weak edge bite on A4 paper, wrong packaging, or barcode failure. Minor means a small polish line or handle color spot inside the approved photo. Not a scratch the buyer suddenly dislikes after 3,000 pcs are packed.
For retail private label cleavers, AQL 2.5 major and AQL 4.0 minor is a common starting point. Some premium channels use AQL 1.5 major. Critical defects should be 0. The sampling standard is often ANSI/ASQ Z1.4 or ISO 2859-1. Ask your cleaver knife supplier to confirm inspection level, lot size, sample size, and acceptance/rejection numbers before production ships. We had one PO where “Level II” was typed as “Lever II,” and the buyer flagged it only after the cartons reached the warehouse. That small typo cost 4 days and 2 warehouse recheck reports, all because nobody checked the QC line on page 3 before release.
Your checklist needs measurable tolerances. Use numbers, not taste. Blade length plus or minus 1.5 mm. Handle length plus or minus 1.0 mm. Blade thickness plus or minus 0.2 mm, weight plus or minus 8%, and logo position plus or minus 1.0 mm. These numbers are not universal; they depend on your model, stamping die, handle mold, and whether the blade is hand-finished after heat treatment. The wrong question is “does it look close?” We have seen this go sideways when a buyer approved a 2.3 mm spine sample, then rejected bulk at 2.45 mm because nobody wrote the tolerance before packing. The math does not work after 120 cartons are sealed.
At TANGFORGE, we keep a sealed golden sample and a signed pre-production sample for cleaver programs. During production in Yangjiang, inspectors compare line output against the sample and the written QC sheet with digital calipers, HRC tester records, edge paper-cut checks, and carton barcode scans. For larger programs, we run in-line checks at grinding and handle assembly, then sharpening, packing, and final random inspection; QC pulls samples every 2 hours on busy shifts. ISO 9001-style records matter only when the approved standard is clear enough for a line inspector to apply at 10:30 p.m. with 28 cartons waiting beside the packing table.
Decide What Approval Actually Releases
A signed sample should release named actions, not open the gate for whatever production decides later. Write the release line by line: blade tooling locked to the 2D profile and spine thickness in mm; handle tooling tied to rivet spacing, scale material, and the jig hole position on the drill fixture; logo method fixed by laser depth, such as 0.18 mm on our fiber laser, or by stamp position; packaging print checked against barcode, warning text, and carton mark; production purchase tied to the PO number; full mass production released against the agreed inspection limit. If you approve only the blade shape while the color box is still pending, write exactly that. If you approve the carton but QC has not pulled the edge-finish sample from the grinding line, write that too. Partial approval protects both sides. It is not paperwork for fun.
For a custom cleaver knife, we run the cleanest release flow as sample approval, pre-production sample, pilot run, then bulk production. The pilot run is normally 50-200 pcs depending on order size and tooling risk; for a 12,000 pcs order, we usually want at least 120 pcs through heat treatment, grinding, polishing, packing, and carton drop check before we call it safe. The heat-treatment rack tells the truth. For repeat orders with no changes, the pilot run can be skipped. For a first order over 5,000 pcs, skipping it is false saving. We have seen this go sideways when the pilot rack showed 7 blades with uneven edge lines and 3 handles shrinking after the 48-hour humidity check, and the buyer then asked why bulk shipment moved from 35 days to 46 days.
Commercial terms should match the approval stage. Typical private label cleaver MOQ is 600-1,200 pcs per SKU for standard steel and handle options, while new molds or special Damascus patterns usually push the quantity higher because the mold shop will not set CNC time for 200 pcs. Normal lead time after sample approval is 35-55 days, depending on order quantity, packaging status, and factory loading; last month one 900 pcs SKU shipped in 38 days, while a 4-SKU gift-box order needed 52 days because the buyer flagged a typo on the PO carton mark. FOB fits importers with their own forwarder. DDP works for smaller brands, but duties and anti-dumping review must be checked before we quote it. Retail compliance is the buyer pushback we hear most often after price.
Keep change control strict after approval. A small request like “make the handle a little darker” changes resin sourcing, Pantone matching, packaging photos, and AQL inspection wording; our QC sheet then needs the new color chip stapled to the file. Use revision numbers. Version A is not Version B. A disciplined cleaver knife factory in China will ask you to sign off the new revision instead of changing production by chat message. It feels slow for one day; the math does not work when 600 pcs of Version A and 600 pcs of Version B land in the same warehouse slot.
Frequently asked questions
For a new private label cleaver, approve at least two physical samples: one golden sample for product construction and one packaging sample with barcode, warning text, country marking, and carton label. If new tooling is involved, add a pre-production sample made from actual production fixtures before releasing bulk production. For orders above 5,000 pcs, a 50-200 pcs pilot run is sensible. Keep one sealed sample at your office and one at the factory. Both should carry the same revision number, date, and signatures so later disputes are judged against the same standard.
It depends on the cleaver type. For a stainless vegetable cleaver, 55-58 HRC is common with steels such as 5Cr15MoV, 1.4116, or similar grades. For lower-cost 3Cr13, 52-54 HRC is more realistic. For a heavy chopping cleaver, do not automatically push hardness higher; toughness and edge geometry matter more. A practical specification is a target band, not a single number, for example 56 plus or minus 1.5 HRC. Ask the cleaver knife manufacturer to record Rockwell test results by batch and define what happens if readings fall outside the approved band.
For minor repeat-order changes, sometimes yes. For a new custom cleaver knife, no. Photos do not tell you handle comfort, balance, edge aggression, burrs, carton strength, or barcode scan quality. You should physically check at least one product sample and one printed packaging sample. Video is useful for showing cutting tests, water soak results, or carton drop checks, but it should support the physical sample, not replace it. If timing is tight, ask the factory to ship samples by DHL, FedEx, or UPS; 3-7 days of courier time is cheaper than reworking a full container.
A practical final inspection checks quantity, assortment, workmanship, dimensions, HRC records, edge sharpness, handle fit, logo, packaging, barcode scanning, carton marks, and drop-test logic. Use AQL 2.5 for major defects and AQL 4.0 for minor defects unless your retailer requires stricter limits. Critical defects should be zero. The inspector should compare production units against the signed golden sample and written spec sheet. For cleavers, pay special attention to blade warp, tip or heel exposure through packaging, loose rivets, sharp spine burrs, and wrong carton weight.
For standard cleaver knife wholesale production using available steel, handle materials, and normal packaging, 35-55 days after sample and deposit approval is realistic. Add 10-20 days if custom packaging needs new print proofing or if a handle mold is new. Damascus, special coatings, or unusual steels may extend the timeline further. Around Chinese New Year, plan additional buffer because many China supply chains slow down for 2-4 weeks. Confirm lead time by SKU, not only by order total, because one delayed handle or box can hold the whole shipment.
Send Your Cleaver Sample Checklist Today
Share your drawing, target price, MOQ, packaging plan, and market requirements. TANGFORGE will review manufacturability and return a practical approval path.
Request a Quote