Blade grinding is where 7 out of 10 knife projects either become sellable stock or come back to the grinding line for rework. You can specify 5Cr15MoV, G10 handles, or a color box with a foam insert, but a 0.8 mm thickness behind the edge on a chef knife will still make the knife feel cheap. We see it fast during QC: the digital caliper reads thick, the paper-cut test drags, and the carton yield drops because blades need sorting before packing. The math doesn't work.
At TANGFORGE in Yangjiang, Zhejiang, China, we see the same buyer problem every season: the drawing says “sharp edge” or “satin grind,” but the factory needs numbers. Put the edge angle at 15° per side or 20° per side, call out thickness behind edge in mm, set the belt grit such as #400 or #600, and define plunge line tolerance before mass production starts. HRC band and AQL level belong on the spec sheet too. We ship about 180,000 knives per month across kitchen and outdoor programs, with pocket, tactical, hunting, and Damascus orders running on separate schedules, so a 0.2 mm grinding miss becomes 3,000 problem pieces before lunch if QC pulled the sample too late.
Why grinding specs drive sourcing results
The knife grinding process is not just a workshop step. It is a sourcing control point. On the grinding line, a 240 grit belt can take off 0.20 mm too much before the operator notices, and that changes edge thickness, heat at the bevel, blade profile, and sharpening feel after coating, polishing, or handle assembly. Leave the spec open and the factory will run the fastest method. We’ve seen this go sideways on retail orders.
For a chef knife, buyers usually ask for smooth cutting, low wedging, and left-right bevel symmetry within 0.2 mm when QC checks it with a caliper. For a hunting or tactical knife, the buyer often pushes back on edge support, tip strength, coating adhesion, and repeatable bevel width after black coating. For a pocket knife, the grind also has to clear the handle, liner, or lock geometry; we once had QC pull 12 samples because the bevel rubbed the liner at closing. “Sharp blade” is the wrong spec to send.
A practical knife grinding process wholesale sourcing guide should turn product words into factory numbers. Instead of “premium edge,” write “15° per side, 0.30 mm behind edge, 600 grit satin finish, HRC 58-60 after heat treatment.” Instead of “strong outdoor grind,” write “flat grind, 20° per side, 0.55 mm behind edge, black oxide or PVD compatible, no burnt edge permitted.” If the PO says “satin” but the sample tag says “hairline,” the grinding master will ask which belt finish to run.
At our Yangjiang factory in China, we lock grinding specs during sample stage, not after production starts. Changing bevel angle after 1,000 blanks are ground is not a small adjustment; the math doesn’t work. It can mean regrinding, repolishing, recoating, or scrapping blades, and a 12-day sample correction can turn into an 18-day production delay. Your purchase order should treat grinding as a measurable specification, not a cosmetic note.
Common grind types and buyer trade-offs
Grind choice changes piece price, cutting feel, and how often QC kicks samples back to the grinding line. You do not need to run the 400# belt yourself, but you should know which grind fits your sales channel and return tolerance. A 12,000 pcs supermarket knife and a 1,000 pcs D2 folding knife cannot share the same spec sheet. We have seen this go sideways when a buyer approved a pretty sample, then rejected mass goods because the bevel width moved 0.6 mm.
| Grind type | Typical use | Buyer advantage | QC risk |
|---|---|---|---|
| Flat grind | Chef, hunting, EDC | Balanced cutting feel with easy scale-up on fixture grinding | Bevel width can run uneven if the jig is loose by 0.3 mm |
| Hollow grind | Pocket, tactical, shaving-style edges | Thin bite at the edge and a clean-looking bevel face | Wheel marks, over-thin edges, and left-right mismatch show fast |
| Convex grind | Outdoor, chopping, premium kitchen | Better edge support with smoother food release on thick blades | More hand work, slower output, and harder pass/fail inspection |
| Scandi grind | Bushcraft, outdoor | Easy field sharpening with a rugged shelf-ready look | Wide bevel faces show 600# belt scratches under side light |
| Double bevel V-edge | Most kitchen and utility knives | Fast production and simple resharpening for end users | Manual sharpening can shift the edge angle after 300-500 pcs |
Flat grind is usually the safest OEM choice because price and repeatability stay under control. Hollow grind sells well in photos and cuts with a sharp first bite, but it needs a stable wheel setup and an operator who checks both sides with a bevel gauge, not just by eye. Convex grind gets requested by premium buyers, and that is fine, but the math does not work if the target price is the same as flat grind; we normally plan 12 days vs 18 days on a 3,000 pcs order because inspection is not as simple as measuring a flat bevel.
For kitchen knives, European and North American buyers often specify 13°-17° per side for fine cutting, with HRC 56-60 depending on steel. For outdoor knives, 18°-22° per side is more common because customers hit bone, rope, and dry wood. Damascus blades need extra care. QC pulled one sample last month after polishing because the 800# correction pass washed out the pattern near the heel and the etch looked uneven under a 5,000K inspection lamp.
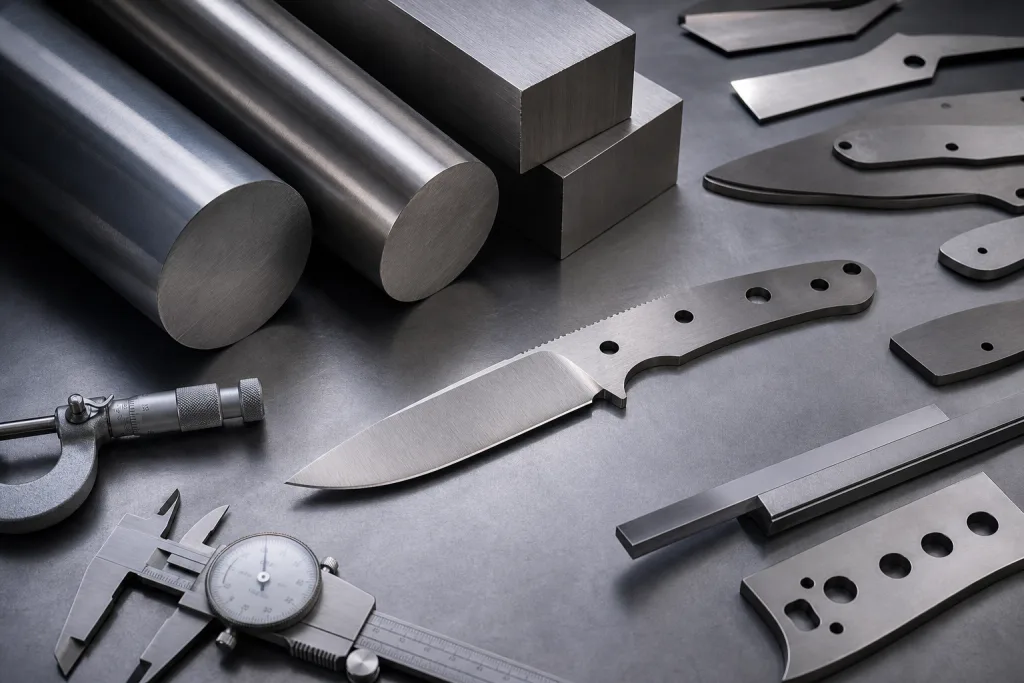
The custom knife grinding process has to match the steel. A 3Cr13 promotional knife at HRC 52-54 should not be ground like a VG10 chef knife at HRC 60-61. A D2 tactical blade at HRC 59-61 needs heat control during finishing because overheated edges can lose bite even when the hardness report looks acceptable 8 mm above the edge. The wrong question is “which grind looks premium”; ask whether the steel, belt sequence, MOQ, and target complaint rate can support it.
Numbers to put on your drawing
A factory cannot inspect words like “sharp” or “premium.” Put numbers on the drawing or approved sample sheet: grinding value, tolerance, and where QC measures it. We run calipers at the spine, micrometer checks behind the edge, and angle gauges after sharpening. Tight tolerance costs money; copying a hand-ground boutique spec onto a 3,000 pcs wholesale order is the wrong question to ask if the target retail is USD 19.99.
Start with blade thickness. A chef knife may use 2.0-2.5 mm spine thickness, while a heavy outdoor fixed blade may use 3.5-5.0 mm. Then specify thickness behind edge before sharpening. For an 8 inch chef knife, 0.25-0.45 mm is a useful range. For a hunting knife, 0.45-0.75 mm gives more edge support. For a tactical knife, the number depends on tip design, coating, and intended use, but 0.50-0.80 mm is common. QC pulled one sample last month at 0.18 mm behind the edge on a supposed bushcraft blade; it cut paper nicely, then chipped in the rope test.
Next define bevel angle. Kitchen knives are often 15° per side, sometimes 12°-14° for Japanese-style profiles using harder steel. Western utility knives may sit at 17°-20° per side. Outdoor knives usually need 20° per side or more unless you are selling a slicing-focused product. If your SKU is for Amazon or retail chains, keep the sharpening angle simple and repeatable; field complaints often come from over-thin edges, not from lack of sharpness on day one. On the grinding line, a 2° drift is easy to see with the angle block, and buyers notice it when 24 pcs from one carton feel different.
Surface finish also matters. A 240 grit satin finish hides small handling marks better than mirror polish. A 600 grit longitudinal satin finish looks cleaner but increases labor and rejects; the math does not work on a 500 pcs MOQ unless the buyer accepts the extra polishing charge. Stonewash is forgiving for pocket knives. Bead blast can create corrosion complaints if the steel and passivation are not controlled. For food-contact kitchen knives, confirm REACH, LFGB, or FDA requirements where applicable, especially if coatings, colored finishes, or handle adhesives are involved. We have seen a PO typo call for “mirror satin,” and production stopped for 6 hours while sales confirmed which finish the buyer meant.
Finally, define inspection points: bevel symmetry checked against the centerline, tip alignment under the gooseneck lamp, plunge line position, burr removal, edge chips over 0.2 mm, overheat marks, and cutting test. If you want CATRA testing, say so early. CATRA is useful for comparing edge retention, but it adds time and cost, and not every SKU needs it. We ship plenty of stable private-label orders using AQL 2.5 plus a 10 pcs rope or paper cut check; CATRA makes sense when the buyer is comparing steels or making a retail claim.
MOQ, pricing, and lead time reality
Knife grinding process MOQ is not a price-list line. It changes with blade profile, steel hardness, surface finish, tooling load, and whether we run an existing ODM blank or open a fresh OEM design. For existing profiles, TANGFORGE can often start from 300 pcs per SKU. For a new blade profile that needs a blanking die, CNC fixture, handle mold, or a dedicated grinding jig, a practical MOQ is 800-1,200 pcs per SKU. Damascus patterns, deep hollow grinds, and coated tactical blades usually need bigger batches because QC may pull 18-25 pcs from the first 300 if the bevel line drifts by 0.3 mm.
Buyers ask why grinding moves the price when the blade shape already exists. This is the wrong question to ask. The cost sits in belt time and scrap rate. A simple stamped kitchen blade with machine-assisted grinding may add only USD 0.35-0.70 in grinding and finishing cost. On our grinding line, that usually means a 240# belt pass, a 600# clean-up, then edge setting. A full-tang outdoor knife with thick D2 steel, hand blending, stonewash, and final sharpening can add USD 1.20-2.80. A mirror-polished Damascus chef knife can exceed that because one hairline scratch after etching sends the blade back to polishing.
For wholesale planning, budget the landed number, not just FOB China. FOB Yangjiang or FOB Shenzhen pricing is common, but 6 out of 10 EU and North American buyers now ask us for DDP estimates before they lock retail margin. DDP is fine for a first check, but keep unit price separate from tooling, packaging, inspection, inland freight, sea or air freight, duty, and VAT or sales tax assumptions. We have seen this go sideways when a PO typed “DDP warehouse” but the buyer’s sheet calculated FOB Shenzhen, and the missing duty wiped out USD 0.42 per knife.
Lead time follows grinding difficulty. A simple repeat order can ship in 30-40 days after deposit. A new OEM knife with sample approval, steel procurement, heat treatment, grinding, finishing, handle assembly, packaging, and final inspection usually needs 45-65 days. If you require BSCI audit documentation, ISO 9001 records, third-party inspection, or special compliance testing, add 7-15 days to the calendar. Fast production is possible, but the math doesn't work if sharpening gets squeezed from 18 days to 12 days; QC pulled the sample last quarter and found uneven edges across 14 cartons.
QC risks buyers should not ignore
The biggest grinding risks usually look small. We have had QC pull a sample that looked fine under the bench light, then fail cutting after 20 strokes because the tip was ground too thin. A burnt edge or uneven bevel can pass quick photos and still bring claims, so OEM buyers should ask how we run the grinding line, not just request final product pictures.
Burnt edge is a serious defect. It happens when belt heat damages the thin cutting area, often on the last 15 mm near the tip where pressure builds fast. Blue or brown color is easy to catch, but polishing can hide the mark. The controls are simple: fresh belts, coolant or lighter pressure where the process allows it, trained operators, and edge-area hardness checks on higher-risk SKUs. If the PO says HRC 58-60, the cutting zone cannot drop soft because one worn #240 belt stayed on the machine too long.
Bevel asymmetry shows up often in manual and semi-automatic grinding. Value knives can accept a small left-right difference, but premium chef knives cannot look crooked in a blister card or gift box. For 30,000-piece wholesale runs, ±0.5 mm bevel width tolerance is workable. For premium display products, buyers may request ±0.3 mm, but the math does not work unless the price includes slower grinding and a higher rejection rate.
Uneven thickness behind edge gives the buyer a knife that cuts well in one spot and drags in another. If the heel measures 0.25 mm behind the edge and the front belly reads 0.70 mm on a digital caliper, the end user will feel it. We measure along the blade, not only at center. For an 8 inch chef knife, three to five measuring points are reasonable, and we usually mark them on the QC sheet before mass production starts.
Burr and wire edge problems create false sharpness. The sample slices copy paper at final check, then loses bite after 6 tomato cuts because the burr folded over. Your QC checklist should require burr removal and a cutting test matched to the product: paper for entry kitchen knives, rope for outdoor knives, food-simulation cuts for chef knives. We have seen this go sideways when the buyer only asked for “sharp enough” on the PO.
Cosmetic grind marks are a commercial problem, not just a factory argument. North American retail buyers often reject visible cross scratches on satin blades, and one buyer flagged 42 pieces in a 500-piece inspection lot because scratches ran through the logo area. European kitchenware distributors often push harder on logo polish and edge line symmetry. Set AQL 2.5 for major defects and AQL 4.0 for minor defects unless your channel requires a different inspection level.
How factory capability should be checked
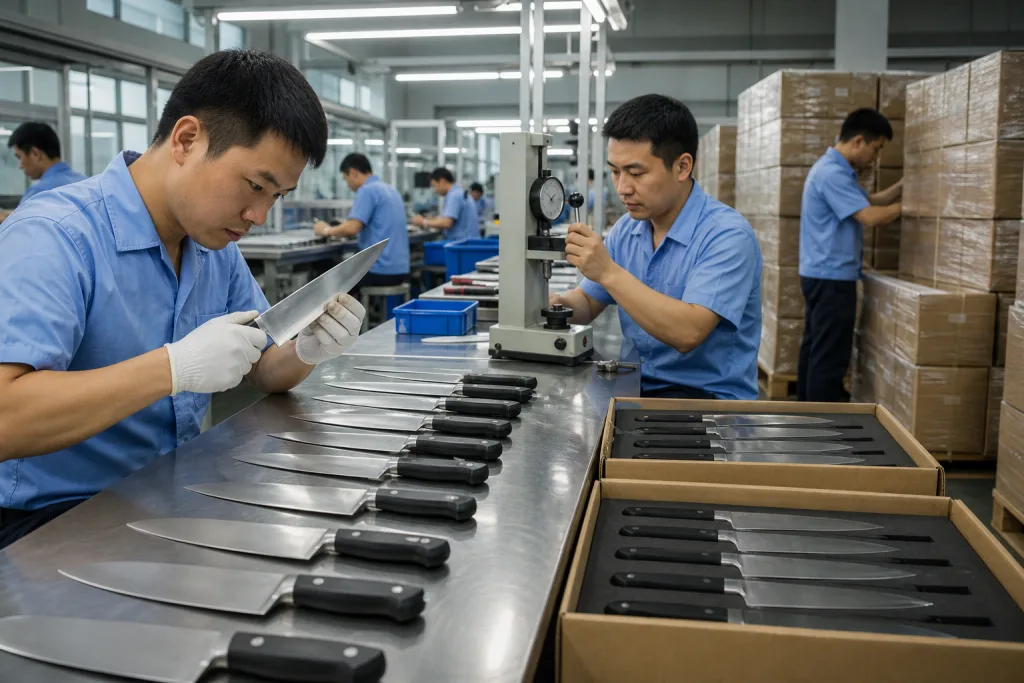
Do not judge a knife grinding process factory China supplier by showroom samples alone. A sample room can spend 45 minutes hand-polishing one chef knife; a 3,000 pc PO on the grinding line cannot. Ask what share of grinding is manual, semi-automatic, CNC-assisted, or jig-controlled. Ask who signs the first 10 production pieces, and how many pieces QC checks before the line is released. We usually see buyers skip this question, then argue about wavy bevels after packing.
A capable factory should walk you through the blade flow: blanking or forging, heat treatment, straightening, rough grinding, fine grinding, surface finishing, sharpening, cleaning, assembly, and final inspection. Watch the parts, not the brochure. If grinding is outsourced, that is not a deal-breaker, but you need the name of the grinding shop, the rejection owner, the rework rule, and the delivery buffer. Hidden subcontracting goes sideways on tactical, Damascus, and premium kitchen knives because a 0.2 mm change behind the edge can change the hand feel.
At TANGFORGE in Yangjiang, Zhejiang, our export team ties buyer specs to workshop travelers before steel is cut. For a chef knife, the traveler may state 5Cr15MoV steel, HRC 56-58, 2.3 mm spine, flat grind, 0.35 mm behind edge, 15° per side final edge, 400 grit satin, laser logo position ±0.5 mm, and AQL 2.5 major inspection. The grinding supervisor signs that sheet at the first-piece table. This beats a photo and a promise.
Ask about calibration as well. Calipers, angle gauges, Rockwell hardness testers, and edge testers need maintenance records, not just stickers on the wall. For sharpness, not every order needs CATRA, but the factory should run the same internal cutting check each time, such as 20 cuts on test paper after final honing. For compliance, BSCI and ISO 9001 help buyers screen suppliers, but they do not replace product-specific QC. A clean audit report still will not fix a crooked bevel line.
If you source from China for private label retail, request pre-production samples from the actual mass-production material, not substitute steel. Confirm whether sample grinding is done by the same line that will run bulk goods. We have seen a senior technician make a perfect handmade sample, then the buyer flagged 38 pcs in the first 500 pcs because the production cell used a different jig stop. The math does not work if your approval sample and bulk process are not the same.
Sample approval and inspection workflow
A good wholesale workflow starts before the purchase order. Send the target retail price, sales market, product use, steel preference, handle material, packaging style and compliance notes. If you only send a photo, the supplier can quote a knife that looks close but cuts differently. For knife grinding, performance sits in the geometry. Asking “can you copy this photo?” is the wrong question to ask. On our side, the engineer marks blade length, spine thickness, and behind-edge target on the drawing before the grinding line prices it.
The first sample should confirm the outline, balance point, grind type, handle fit, logo process, surface finish, and cutting feel on paper or tomato. For new OEM tooling, expect 10-20 days for first samples after drawing confirmation. For ODM models with adjusted logo and packaging, samples can often be ready in 7-12 days. If you need two grinding options, write them on the sample sheet: for example, 15° per side and 20° per side, or 0.35 mm and 0.55 mm behind edge. QC pulled the sample with a digital angle gauge last month because the buyer flagged “sharp but too fragile.” Two knives on the table settle that faster than 6 email rounds.
Once the sample is approved, freeze it. Keep one golden sample at your office and one at the factory. Label it with date, SKU, revision number, steel, HRC range, grind specification, finish, and packaging version. If you approve a change later, update the revision before bulk production starts. We have seen 4 disputes in 12 months caused by old samples sitting in a buyer’s cabinet while the factory was already running Rev. B. The golden sample should sit in a sealed PE bag with the signed sample card, not loose on someone’s desk.
During production, we run three checks. First, inspect the first 20-50 pcs after line setup to catch angle error, left-right asymmetry, and satin-line scratches under the 600 grit belt. Second, inspect mid-production before worn belts or a shift change pushes the edge thicker by 0.10 mm. Third, conduct final random inspection using agreed AQL levels before shipment. For higher-risk orders, a third-party inspection company should check cartons, barcode, FNSKU labels, sharpness, cosmetic defects, and packing drop-test requirements. We have seen this go sideways when the blade passed but the Amazon FNSKU was one digit off.
For distributors, carton control matters as much as blade control. A well-ground knife with the wrong SKU sticker, missing warning insert, or weak export carton can still become a chargeback. Tie your grinding approval to the full shipment checklist: inner box spec, master carton strength, pallet mark, and HS code documents. Before we ship, the packing team checks the PO against the carton mark with a scanner; one buyer once typed “8 inch chef” on the PO while the artwork said “20 cm chef,” and QC stopped the pallet at 37 cartons.
Frequently asked questions
For an existing ODM blade profile, 300 pcs per SKU is usually realistic if the steel, finish, and packaging are standard. For a new OEM blade shape or a custom knife grinding process requiring new jigs, blanking tooling, or special polishing, plan on 800-1,200 pcs per SKU. Damascus, thick tactical blades, or mirror-polished chef knives may need higher MOQ because reject rates are higher and setup time is longer. If you are testing a new market, ask for one existing model with modified grind angle, logo, and packaging before investing in a full custom profile.
For simple kitchen knives, grinding and finishing may add about USD 0.35-0.70 per piece compared with a rough blank. For heavier outdoor knives, D2 blades, hollow grinds, stonewash, or hand-blended bevels, the added cost is often USD 1.20-2.80 per piece. Mirror polish, Damascus etching, and very tight bevel symmetry can cost more because they slow production and increase rejects. Always ask whether the quote includes rough grinding, fine grinding, surface finish, sharpening, cleaning, and final inspection, not just one grinding operation.
At minimum, specify grind type, blade spine thickness, thickness behind edge, final sharpening angle, surface finish grit, HRC range, and cosmetic tolerance. For example: flat grind, 2.3 mm spine, 0.35 mm behind edge, 15° per side, HRC 56-58, 400 grit satin finish, bevel width tolerance ±0.5 mm. For pocket or tactical knives, also define tip thickness, plunge line position, coating compatibility, and lock clearance. If your drawing only says “sharp” or “premium grind,” the factory will make production assumptions that may not match your market.
Use a combination of measurement, visual checks, and cutting tests. Measure thickness behind edge at 3-5 points, check bevel symmetry, inspect for burnt edges, confirm burr removal, and test cutting on paper, rope, cardboard, or food simulation depending on the knife category. For wholesale shipments, AQL 2.5 for major defects and AQL 4.0 for minor cosmetic defects is a practical starting point. For premium retail, tighten cosmetic criteria but expect higher cost. Keep a golden sample at the factory and compare bulk goods against it during final inspection.
You can, but it should be treated as an engineering change, not a casual comment. If production has not started, the factory can update the work instruction and confirm a revised sample. If blades are already rough-ground, changing from 20° to 15° per side may require regrinding, repolishing, recoating, or scrapping affected pieces. That can add 7-15 days and extra cost. The safer process is to test two or three bevel options during sampling, approve one revision, and freeze that specification before deposit-based mass production begins.
Send your grinding specs for review
Share your drawing, target price, MOQ, steel, and market. Our Yangjiang export team will check grind feasibility, QC risks, and OEM production options.
Request a Quote